How To Get Perfect Summer Nails At Home Step By Step
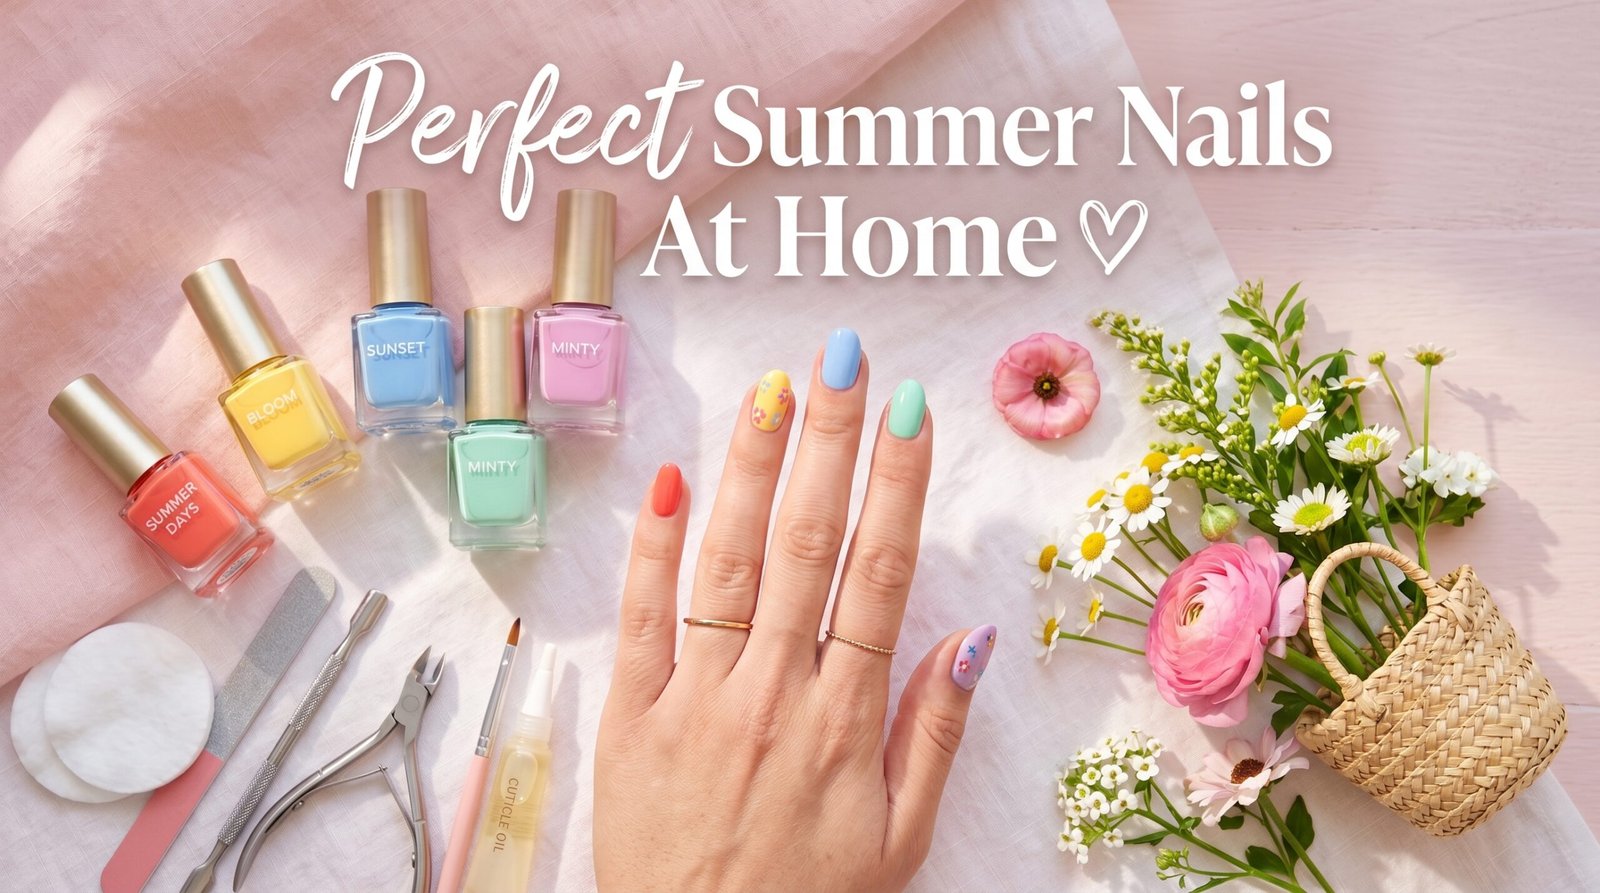
Getting perfect summer nails at home is an achievable, cost-effective way to enjoy salon-quality manicures without professional appointments or expensive services. This comprehensive guide teaches you how to prepare, shape, polish, and maintain beautiful summer nails using proper techniques, the right tools, and seasonal color choices that capture the vibrant essence of summer. Whether you prefer classic solid colors, trendy nail art, or minimalist designs, mastering at-home manicure techniques allows you to create stunning summer nails that last while expressing your personal style.
Perfect summer nails require more than simply applying polish—they involve proper nail preparation, cuticle care, shaping techniques, base and top coat application, and maintenance strategies that prevent chipping and extend wear time. This article covers everything from essential tools and products to step-by-step application methods, summer-specific nail trends, common mistakes to avoid, and troubleshooting solutions for typical at-home manicure challenges.
Summer presents unique nail care opportunities with bright colors, playful designs, and nail art that reflects the season’s energy. By following the detailed steps and professional tips outlined in this guide, you’ll achieve manicures that rival salon results while saving money and enjoying the creative satisfaction of doing your own nails at home.
What Are Perfect Summer Nails?
Quick Answer: Perfect summer nails are well-groomed, neatly shaped, and polished nails featuring seasonal colors, designs, or finishes that complement summer fashion while maintaining healthy nail condition and long-lasting wear.
Perfect summer nails represent the intersection of nail health, aesthetic appeal, and seasonal appropriateness. Unlike basic nail polish application, achieving perfect summer nails involves comprehensive preparation that creates an ideal canvas for color and design. This includes addressing nail health issues like brittleness or ridges, shaping nails to flattering and practical lengths, maintaining moisturized cuticles, and ensuring smooth nail surfaces that allow polish to adhere properly and wear evenly.
The “summer” aspect refers to color choices, designs, and finishes that capture the season’s vibrant, carefree energy. Summer nails typically feature brighter colors than other seasons—vivid corals, sunny yellows, ocean blues, tropical greens, and bold pinks that reflect summer’s warmth and vibrancy. Design elements often incorporate summer themes: palm trees, fruits, flowers, beach scenes, or abstract patterns in colors reminiscent of summer settings. However, summer nails can also be elegantly simple with neutral tones or classic reds that suit warm weather without elaborate designs.
The “perfect” designation means nails that look professionally done with even polish application, clean cuticle lines, no flooding onto skin, appropriate shine level, and durability that withstands summer activities like swimming, beach trips, and outdoor events. Perfect nails also maintain hand and nail health rather than compromising it—they strengthen rather than damage natural nails through proper product use and care techniques.
Why Do Summer Nails At Home?
Creating summer nails at home offers numerous practical and creative benefits beyond simple cost savings. Professional manicures typically cost $25-$60 per session, with gel manicures ranging even higher. Doing your own nails eliminates this recurring expense while providing unlimited color changes and design experimentation without additional cost. Over a summer season, home manicures save hundreds of dollars that can be redirected toward other priorities.
Convenience and time efficiency make home manicures particularly appealing. Salon appointments require scheduling, travel time, and waiting periods, consuming 60-90 minutes or more of your day. Home manicures happen on your schedule—early morning, late evening, or whenever convenient—without leaving your house. You control the pace, take breaks as needed, and multitask by watching shows or listening to music during drying time.
Creative control represents another significant advantage. At salons, you’re limited to available colors and nail technicians’ skills, styles, and interpretation of your requests. At home, you experiment freely with color combinations, try trending techniques through tutorials, and refine designs until they match your vision exactly. This creative freedom allows personal expression and skill development that salon visits don’t provide.
Home manicures also ensure hygienic practices using your own tools that aren’t shared with other clients. You control product quality, avoiding potentially harmful ingredients and choosing formulas aligned with your values—vegan, cruelty-free, non-toxic, or specific brands you trust. For people with sensitivities or allergies, home manicures eliminate exposure to salon chemicals and unfamiliar products.
Finally, the satisfaction of mastering a practical skill and creating something beautiful yourself provides emotional and psychological benefits. Successfully completing professional-looking manicures builds confidence, offers relaxing self-care time, and creates tangible results you can admire throughout the week.
Also Read: Summer Nail Trends 2026
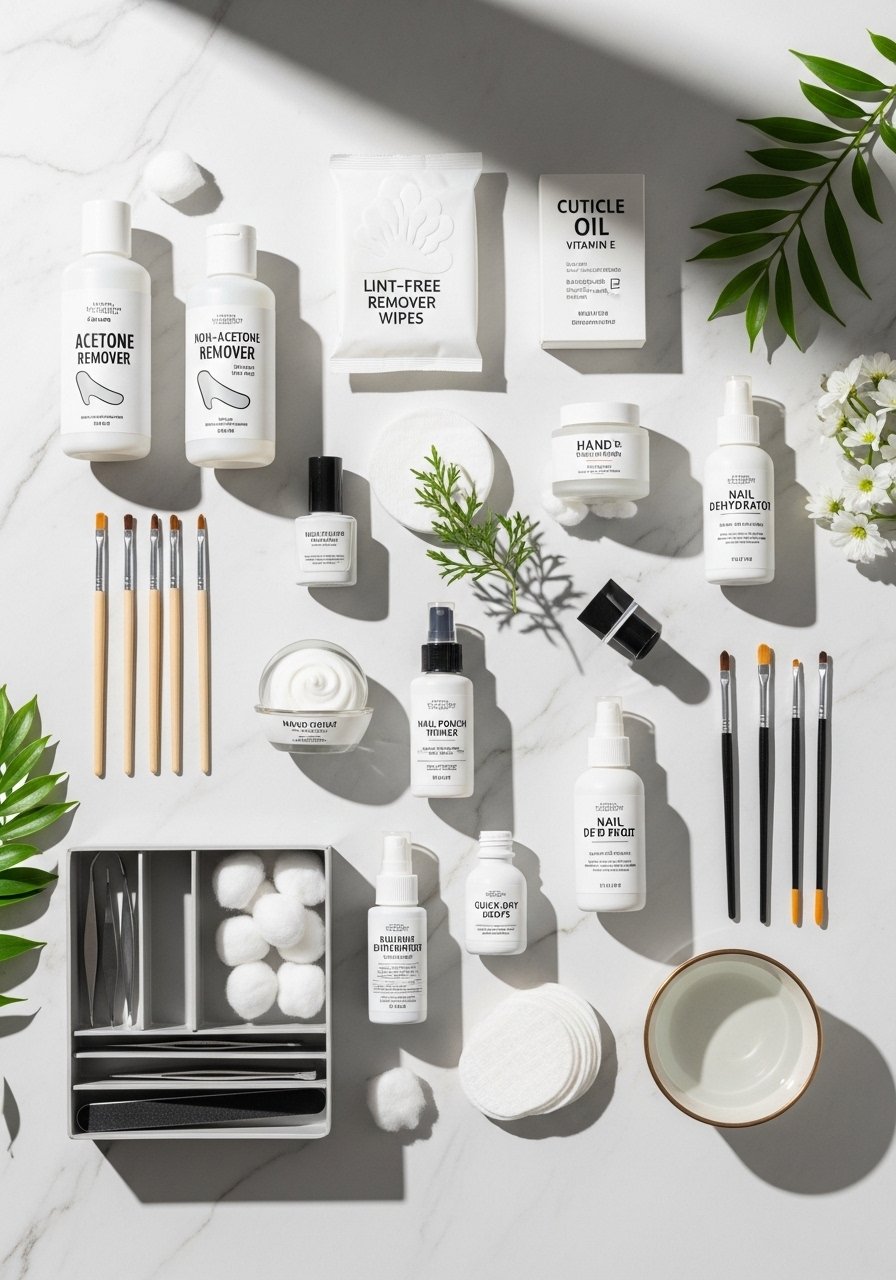
Essential Tools and Supplies You’ll Need
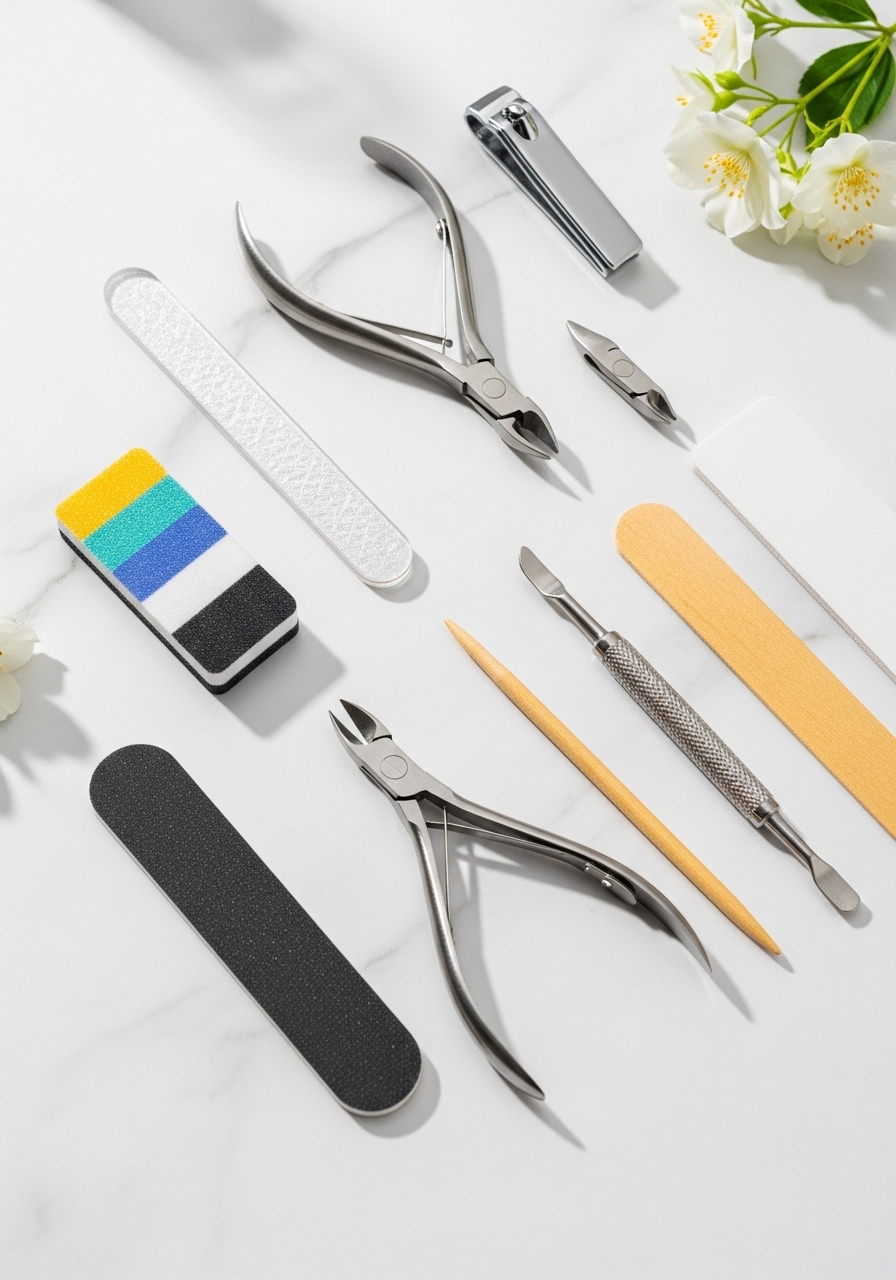
Basic Nail Care Tools
Achieving perfect summer nails at home requires specific tools that enable proper preparation and application. Quality nail clippers in appropriate sizes—larger for fingernails, smaller for precision work—create clean cuts without splitting or crushing nails. Clippers with sharp, aligned blades produce smooth cuts, while dull clippers cause splitting and damage. Invest in stainless steel clippers that maintain sharpness and resist rust from bathroom humidity.
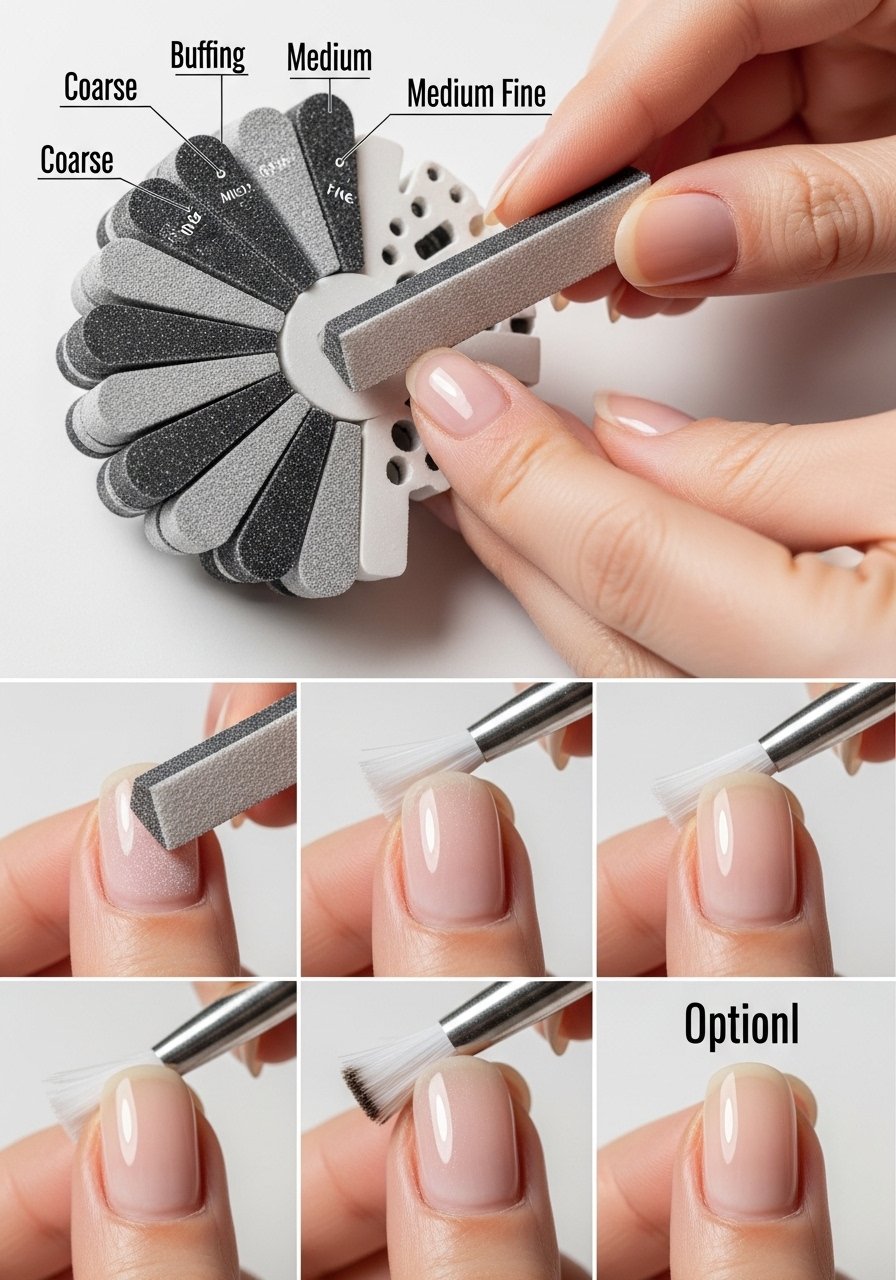
Nail files serve multiple purposes in creating perfect nails. Emery boards or glass nail files shape nail edges and smooth them after clipping. Glass files offer advantages over traditional emery boards: they’re gentler on nails, create smoother edges, last indefinitely with proper care, and can be sanitized easily. For natural nails, choose files with 180-240 grit—lower numbers indicate coarser files suitable for artificial nails, while higher grits work for natural nails without causing damage.
Buffing blocks or files smooth nail surfaces, removing ridges and creating even texture that helps polish adhere. Multi-sided buffing blocks typically include different grits for various stages: coarser sides remove ridges and imperfections, while finer sides polish to a smooth, slightly shiny finish. Avoid over-buffing, which thins nails and weakens them—gentle buffing once weekly suffices for most people.
Cuticle pushers, whether metal or wooden orange sticks, push back cuticles to create clean nail beds and allow polish application close to cuticle lines. Metal pushers offer precision and durability but require gentle use to avoid injury, while wooden orange sticks provide disposable, gentle options. Cuticle nippers carefully remove excess dead skin and hangnails without cutting living tissue—use cautiously and only on clearly dead skin to prevent injury and infection.
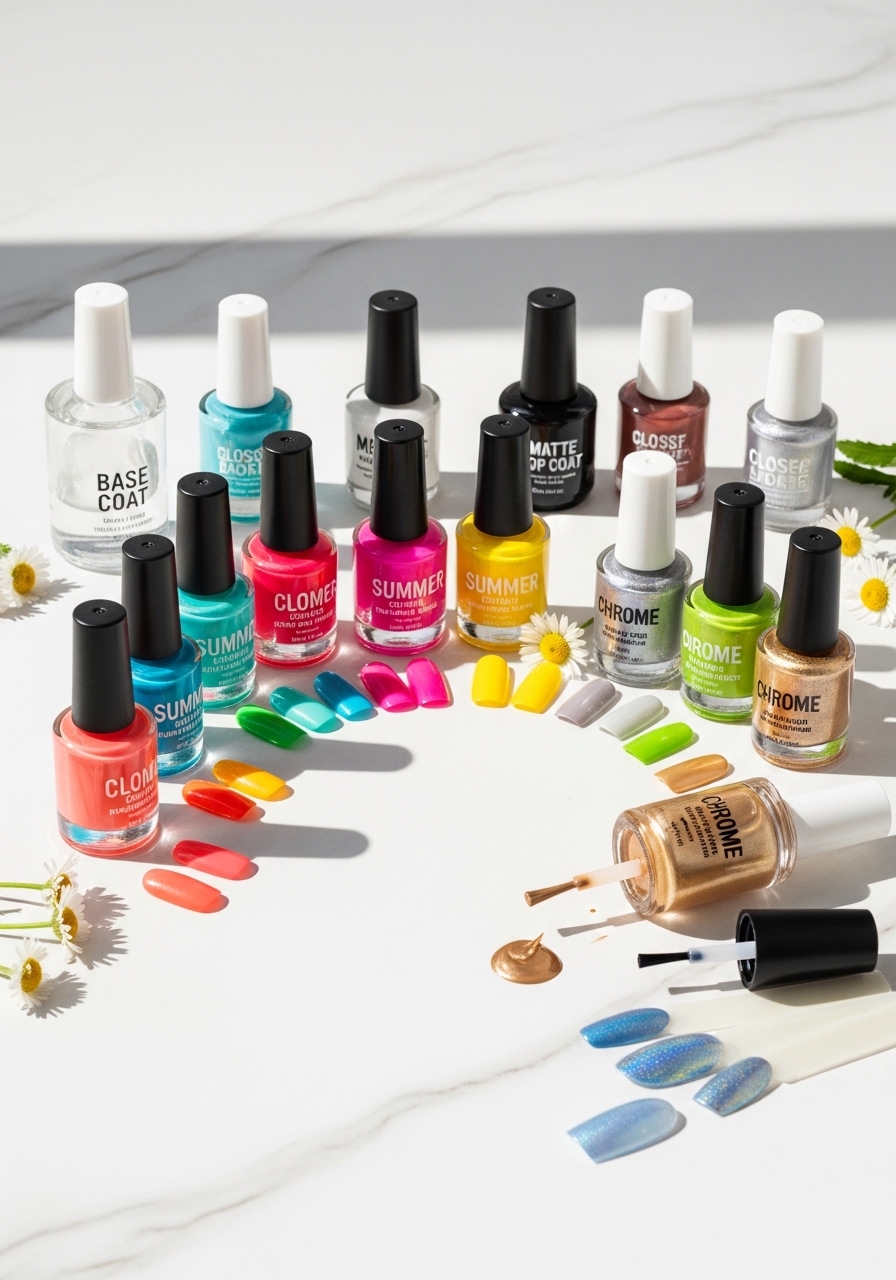
Polishes and Finishes
Base coat forms the foundation of long-lasting manicures by creating adhesive surfaces for polish while protecting natural nails from staining. Quality base coats contain ingredients that fill minor ridges, strengthen nails, and prevent pigment absorption from colored polishes. Specialized base coats address specific needs: ridge-filling formulas smooth uneven surfaces, strengthening bases support brittle nails, and peel-off bases allow easy polish removal for frequent color changers.
Nail polish in your chosen colors represents the visible element of your manicure. Quality nail polishes feature good pigmentation requiring fewer coats for opacity, smooth consistency that applies evenly without streaking, and formulas that resist chipping and maintain color vibrancy. Summer nail polish collections should include bright, vibrant shades—corals, yellows, turquoise, hot pink, and lime green—alongside versatile neutrals like nude, white, and soft pink that work with any outfit.
Top coat seals polish, adds shine, and dramatically extends manicure life by protecting color from chips and scratches. Fast-dry top coats reduce drying time significantly, while glossy top coats create high-shine finishes. Matte top coats transform any polish into flat, non-shiny finishes for modern looks. Some top coats include strengthening ingredients or UV protection that prevents color fading in summer sun exposure.
Consider specialized polishes for summer variety: gel-effect polishes that mimic gel manicure shine without UV lamps, magnetic polishes that create dimensional patterns with special magnets, chrome or metallic finishes for futuristic looks, and thermal polishes that change color with temperature fluctuations. Having diverse polish types allows creative experimentation and keeps summer nails interesting throughout the season.
Additional Essential Supplies
Nail polish remover effectively removes old polish before new applications. Acetone-based removers work fastest and remove stubborn glitter or dark polishes most effectively, but they can be drying to nails and cuticles. Non-acetone removers offer gentler alternatives that moisturize while removing polish, though they require more effort for difficult polishes. Keep both types available—acetone for tough removals and non-acetone for regular color changes.
Cotton pads, cotton balls, or reusable nail wipes remove polish during preparation. Pre-saturated nail polish remover pads offer convenience for travel or quick changes. Some manicurists prefer lint-free nail wipes that don’t leave fibers on nails, ensuring perfectly clean surfaces before polish application.
Cuticle oil and hand cream maintain nail and skin health between manicures. Cuticle oil containing vitamin E, jojoba oil, or specialized nail-strengthening ingredients moisturizes cuticles, prevents hangnails, and promotes healthy nail growth. Apply daily, especially before bed, massaging into cuticles and nail beds. Hand cream protects skin from summer sun, chlorine, and frequent washing, maintaining smooth, youthful-looking hands that complement beautiful nails.
Clean-up tools correct application mistakes and create precise edges. Small brushes dipped in nail polish remover clean polish that floods onto skin or cuticles. Cotton swabs work for larger clean-up areas, while precision brushes enable detailed correction. Some manicurists use latex-based peel-off barriers painted around nails before polish application—once polish dries, the barrier peels away with any overflow, leaving perfect edges.
Organize supplies in a dedicated manicure kit or container that keeps everything accessible and prevents products from cluttering your space. Good organization makes the process more enjoyable and ensures you don’t skip steps due to missing or hard-to-find supplies.
Preparing Your Nails: The Foundation for Perfect Results
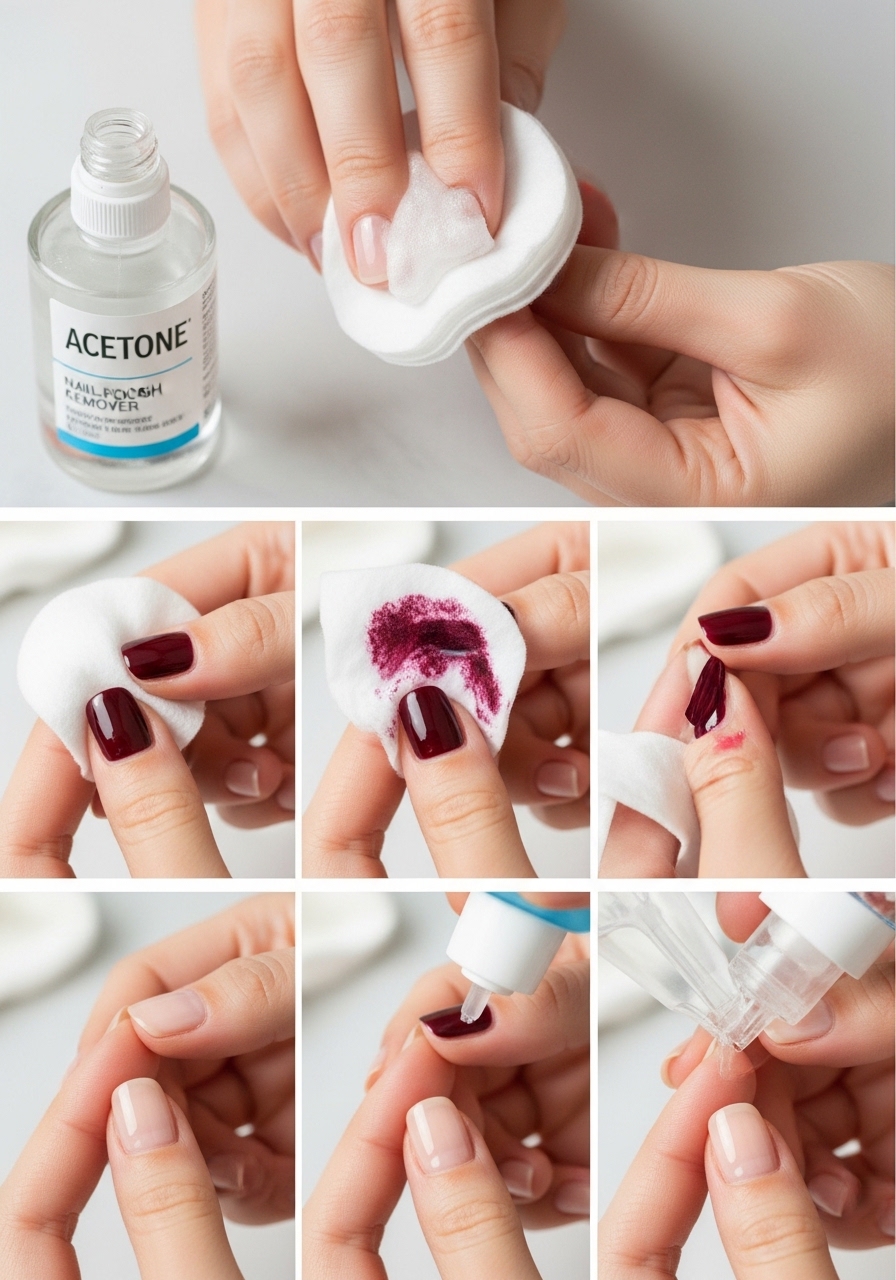
Removing Old Polish Completely
Thorough polish removal creates clean canvases for new manicures and allows assessment of natural nail condition. Start by saturating a cotton pad with nail polish remover and pressing it firmly against each nail for 5-10 seconds. This soaking time softens polish, making removal easier and preventing excessive rubbing that can damage nail surfaces.
Wipe polish away using firm, smooth strokes from cuticle to tip. For stubborn polish, particularly glitters or dark colors, use the foil method: saturate cotton pads with acetone remover, place on nails, wrap fingertips in small aluminum foil squares, and wait 5-10 minutes. The enclosed heat and acetone concentration break down difficult polish, allowing easy removal without aggressive scrubbing.
Check each nail carefully under good lighting to ensure complete polish removal, including around cuticle edges and nail sides where color often persists. Remaining polish prevents proper adhesion of new applications and creates uneven surfaces. After removing all polish, wash hands with soap and water to eliminate remover residue, or wipe nails with fresh cotton saturated with rubbing alcohol.
Allow nails to breathe between constant polish applications. While perfect summer nails often mean continuous color, schedule occasional polish-free periods—even just 24-48 hours—to let nails recover. During these breaks, apply strengthening treatments or intensive cuticle oil to promote nail health.
Shaping Nails to Your Preferred Style
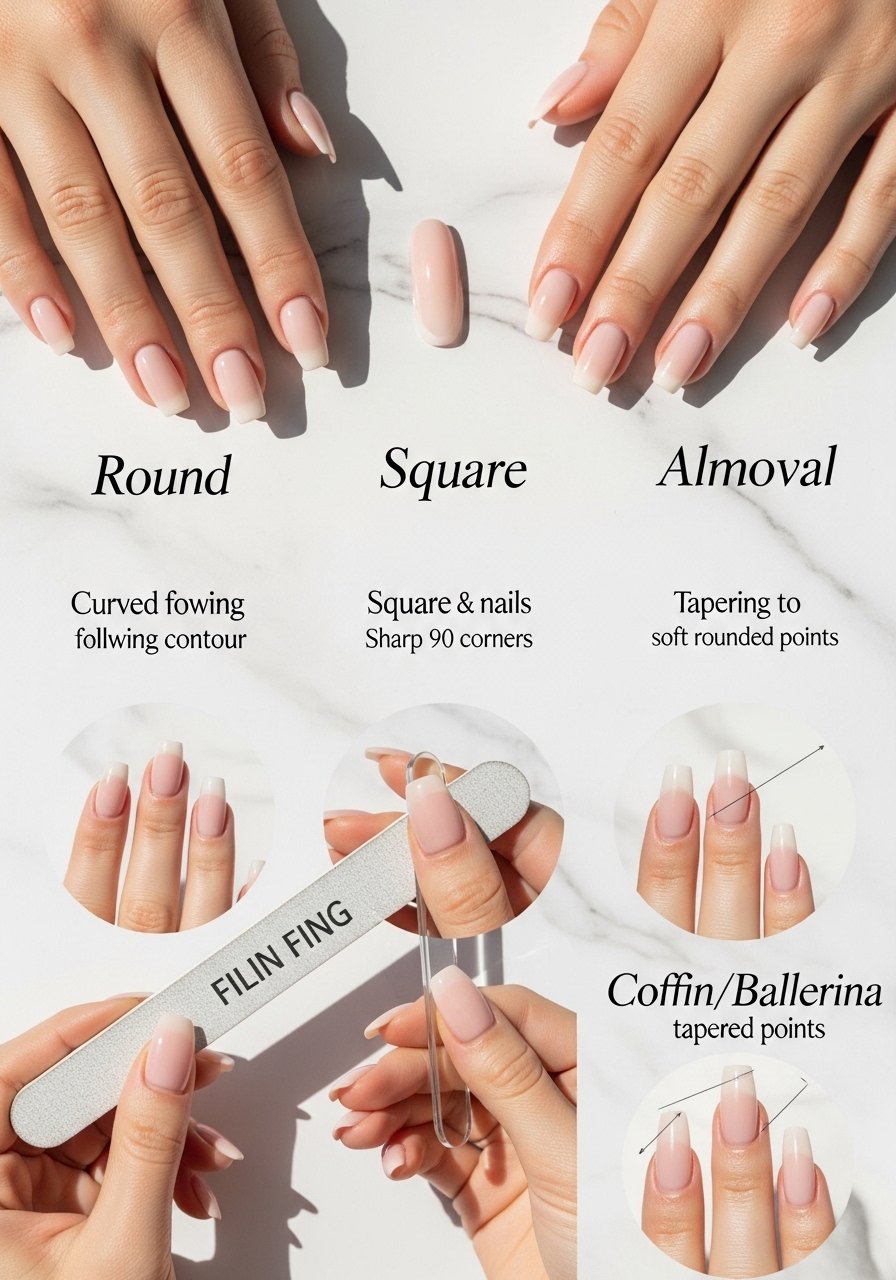
Nail shaping dramatically impacts both appearance and practicality of your manicure. Choose shapes based on finger length, nail bed width, lifestyle, and personal preference. Common nail shapes include:
Round nails feature curved edges that follow the natural fingertip shape. This classic, low-maintenance shape suits shorter nails, people who use their hands extensively, and those preferring practical over dramatic looks. Round nails resist breaking and snagging, making them ideal for active summer activities. To create round nails, file from sides toward center in one direction (never saw back and forth), following your fingertip’s natural curve.
Square nails have straight edges with sharp, 90-degree corners. This shape creates modern, clean aesthetics and works well for nail art with defined edges. However, sharp corners catch on clothing and break more easily. Square nails suit longer nails and people with wider nail beds. File straight across the tip, then lightly file corners to create perfect right angles.
Squoval nails combine square and oval shapes with straight edges and gently rounded corners. This versatile shape offers square nails’ modern look with oval nails’ practicality, making it extremely popular. Squoval suits most nail lengths and bed widths. Create squoval nails by filing straight across, then gently rounding sharp corners while maintaining mostly straight edges.
Almond nails taper gradually to rounded points, creating elegant, feminine looks that elongate fingers visually. Almond shapes require moderate to long nail length and more maintenance since points are vulnerable to breaking. File from each side at angles toward center, creating gradual tapers that meet in soft points.
Stiletto and coffin/ballerina nails represent dramatic shapes requiring significant length, typically achieved with artificial nails rather than natural growth. These fashion-forward shapes appear in editorial and social media but prove impractical for most daily activities.
When shaping, file in one direction rather than sawing back and forth, which weakens nail edges and causes splitting. Use the file’s full length in smooth, even strokes. Shape nails to similar lengths for uniform appearance—hold hands at arm’s length to check that nails look balanced together.
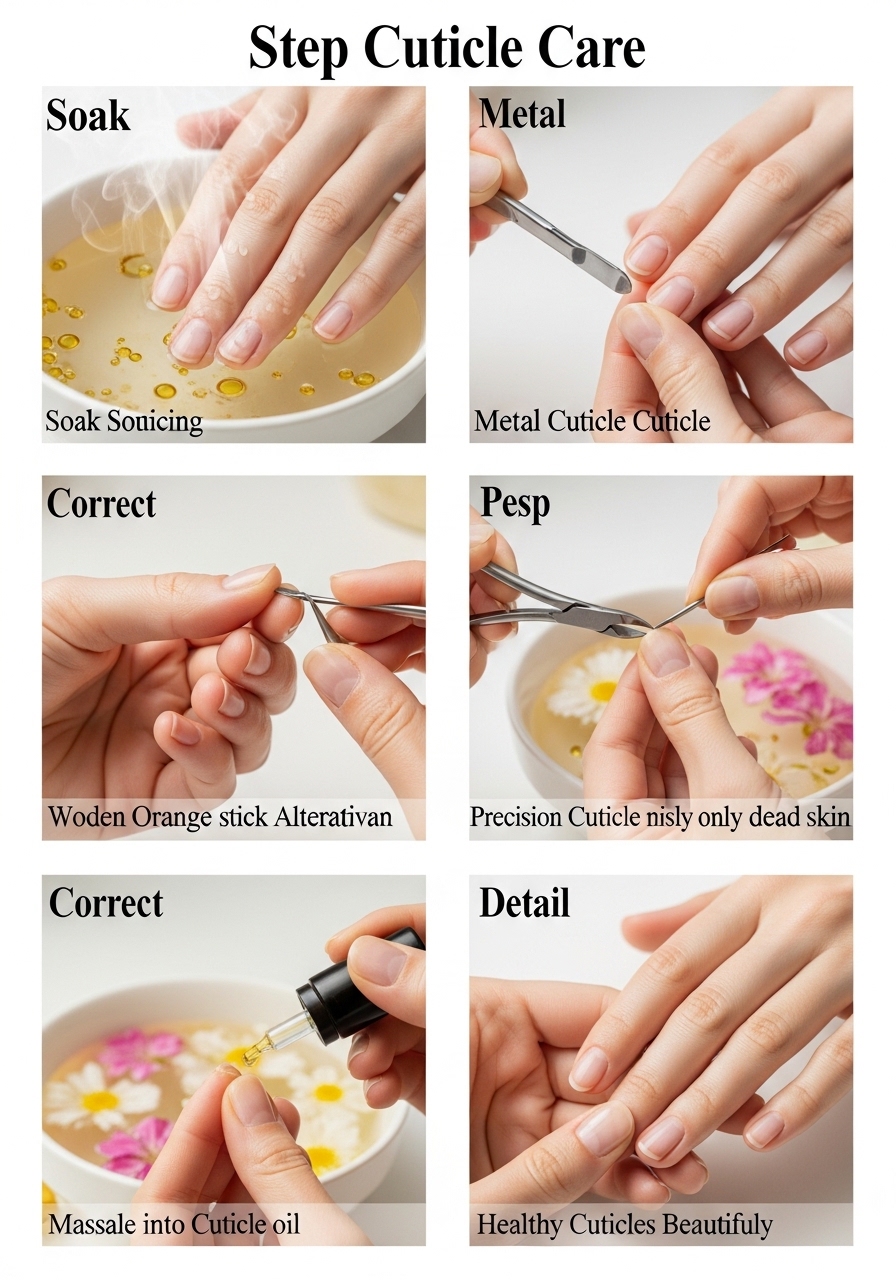
Caring for Cuticles Properly
Healthy, well-maintained cuticles frame nails beautifully and prevent infections that compromise nail health. Start cuticle care by softening them—soak fingertips in warm water for 3-5 minutes, or apply cuticle remover gel that chemically softens dead skin. Some people add a few drops of essential oils or gentle soap to soaking water for added benefit and pleasant scent.
After softening, gently push cuticles back using a cuticle pusher or orange stick, working carefully around each nail to reveal more nail bed. Push gently—cuticles protect nail matrix (growth area) from bacteria and infection, so aggressive pushing or cutting living cuticle causes damage and health risks. Only push back the thin layer of dead skin adhering to nail plates, not the living cuticle seal at the base of nails.
Address hangnails and excess dead cuticle skin with sharp cuticle nippers, carefully trimming only clearly dead skin. Avoid cutting or tearing living tissue, which creates entry points for infection and causes painful wounds. If you’re unsure whether skin is dead or living, leave it—better to have slightly imperfect cuticles than risk injury.
After pushing and trimming, apply cuticle oil generously to each nail, massaging it into cuticles and nail beds. This step replaces moisture lost during preparation and creates healthy, supple cuticles that enhance your manicure’s appearance. During summer, when sun exposure and water activities dry skin, cuticle care becomes even more important for maintaining nail health.
Buffing and Smoothing Nail Surfaces
Buffing creates smooth nail surfaces that allow polish to adhere evenly and appear glossy and professional. Start with clean, dry nails after cuticle care. Using a buffing block or nail buffer, gently buff each nail surface using light pressure and smooth motions. Work in one direction or use gentle circular motions, covering the entire nail surface.
Different buffing block sides serve specific purposes. Coarser sides (lower grit numbers) remove ridges, smooth imperfections, and prepare nail surfaces. Medium sides continue smoothing while beginning to create shine. Finest sides polish nails to smooth, slightly shiny finishes. Use each side progressively—coarse to medium to fine—for best results.
Avoid over-buffing, which thins nails dangerously and weakens their structure. Once weekly buffing suffices for most people; more frequent buffing is unnecessary and potentially harmful. If your nails are already thin or flexible, minimize buffing or skip it entirely, relying instead on ridge-filling base coats to create smooth surfaces.
After buffing, wash hands or wipe nails with rubbing alcohol to remove buffing dust and oils. This step ensures perfectly clean surfaces for polish adhesion. Some nail professionals recommend gently scrubbing nails with a soft brush to remove all debris from buffing and daily activities.
For nails with significant ridges that buffing doesn’t completely address, use ridge-filling base coats that contain smoothing ingredients. These products fill imperfections chemically rather than physically removing nail material through buffing, offering safer alternatives for creating smooth surfaces.
Step-by-Step Summer Nail Application Process
Step 1: Clean and Dehydrate Nail Surface
After completing all preparation steps, ensure nails are absolutely clean and oil-free before polish application. Wash hands thoroughly with soap and water, paying special attention to nails and removing all traces of cuticle oil, hand cream, or natural oils. Dry hands completely—water on nails prevents proper polish adhesion.
For maximum polish adherence and longevity, dehydrate nail surfaces using rubbing alcohol or specialized nail dehydrator products. Saturate a lint-free pad with rubbing alcohol (70% or higher concentration) and wipe each nail thoroughly, including edges and the underside of nail tips. This step removes remaining oils, moisture, and any invisible residue that could compromise polish adhesion.
Some nail professionals use nail primers—specialized products that further prepare nail surfaces and enhance polish bonding. While not essential for basic manicures, primers benefit people with naturally oily nails or those struggling with polish that chips or peels quickly. Apply primer sparingly according to product directions, allowing it to dry completely before proceeding.
After dehydrating, avoid touching your nails, rubbing your face, or any other activities that transfer oils back onto prepared surfaces. Work efficiently to apply polish while nails remain clean and oil-free. If significant time passes between cleaning and polishing, wipe nails again with alcohol before beginning application.
This cleaning step might seem excessive, but it dramatically impacts manicure longevity. Polish applied to oily or dirty nails begins lifting and chipping within days, while properly cleaned nails hold polish securely for a week or longer with proper care.
Step 2: Apply Base Coat
Base coat serves multiple critical functions: protecting natural nails from staining, creating adhesive surfaces for colored polish, filling minor ridges, and often strengthening nails with beneficial ingredients. Never skip base coat, even when you’re impatient to apply color—this step directly impacts how long your manicure lasts and how healthy your nails remain.
Begin with one hand, applying base coat to all five nails before moving to the second hand. Open your base coat and wipe the brush against the bottle neck to remove excess product—too much base coat creates thick, uneven layers that take forever to dry. Starting at your dominant hand’s thumb, apply base coat in three strokes: one down the center from cuticle to tip, followed by one stroke on each side.
Apply base coat close to cuticles without flooding onto skin. The brush should come within 1-2 millimeters of cuticles, creating coverage of the entire nail without polish touching skin. If you accidentally flood cuticles, use a clean-up brush dipped in remover to correct immediately, before the base coat dries.
Pay special attention to nail tips, ensuring base coat completely covers the free edge (the part extending beyond your fingertip). “Capping” or “sealing” the tip prevents chipping and extends manicure life significantly. After applying base coat to the nail surface, run the brush across the nail’s free edge to seal it completely.
Allow base coat to dry completely before applying colored polish—typically 1-2 minutes depending on the product. Base coat should feel dry to light touch and not tacky. Applying colored polish over wet base coat causes dragging, uneven application, and poor adhesion. Use drying time productively by checking your phone, sipping water, or organizing polish colors.
For nails with significant ridges, apply two thin layers of ridge-filling base coat rather than one thick layer, allowing each to dry completely. This builds smooth surfaces more effectively than single heavy coats while preventing the bubbling and uneven drying that thick layers create.
Step 3: Apply First Coat of Colored Polish
Colored polish application requires patience and technique for even, professional-looking results. Begin with proper polish consistency—if your polish has thickened from age or evaporation, add a few drops of nail polish thinner (never nail polish remover, which breaks down polish formulas) and shake gently to restore smooth consistency.
Before application, roll the polish bottle between your palms rather than shaking it. Rolling mixes pigments evenly without creating air bubbles that shaking produces. Open the bottle and wipe the brush against the neck to remove excess polish—the right amount creates thin, even coats without flooding.
Starting with your dominant hand’s thumb, place a small bead of polish near the cuticle (not touching it). Gently push this bead toward the cuticle until it’s about 1 millimeter away, then draw the brush smoothly toward the nail tip in one fluid motion. This creates the center stripe. Next, apply polish to each side of the nail using similar smooth strokes from cuticle to tip.
The first coat should be thin—barely opaque coverage is expected and correct. Thin first coats dry faster, create even bases for second coats, and prevent the thick, goopy application that leads to smudging, bubbling, and extended drying times. If your first coat looks streaky or patchy, resist the urge to apply more polish—the second coat will build opacity.
Cap the tip by running the brush across the free edge after completing the nail surface. This sealing step on every coat prevents chipping from tip wear, the most common cause of early manicure breakdown. Don’t skip this step even though it seems tedious—it’s essential for long-lasting results.
If you flood cuticles or get polish on skin, don’t attempt to fix it while polish is wet—you’ll likely make it worse. Instead, wait until polish dries completely, then use a clean-up brush dipped in remover to correct edges. Alternatively, some people find it easier to clean up after the entire manicure is complete and fully dry.
Apply first coats to all ten nails before pausing. Most polishes allow you to complete both hands’ first coats before the first nail you polished is dry enough for the second coat, creating efficient workflow.
Step 4: Apply Second Coat of Colored Polish
Wait for the first coat to dry to light touch before applying the second coat—typically 2-3 minutes for most polishes. Test by lightly touching a nail with a clean finger from your opposite hand; if it feels dry and doesn’t transfer color, it’s ready for the second coat. Applying second coats over wet first coats causes dragging, smudging, and uneven texture.
Apply the second coat using identical technique to the first: thin application, three-stroke method (center and two sides), staying close to cuticles without flooding, and capping tips. The second coat should achieve full opacity for most polishes. If your chosen color remains sheer or streaky after two coats, allow the second coat to dry completely before considering a third coat.
Generally, two thin coats produce better results than three or more coats. Multiple layers increase drying time dramatically and create thickness that’s more prone to smudging, bubbling, and peeling. If two thin coats don’t achieve desired opacity, the formula itself may be too sheer, suggesting you need a different polish rather than additional coats.
Some polish colors and finishes require special considerations. Neon polishes often need white base coat underneath to achieve true color vibrancy—apply white polish over clear base coat, allow it to dry, then apply neon shades. Glitter polishes may need three thin coats for adequate sparkle coverage. Sheer, jelly-style polishes intentionally remain translucent, creating subtle color washes rather than opaque coverage.
After completing second coats on all nails, wait at least 2-3 minutes before applying top coat. Many people rush this step, applying top coat immediately and causing the underlying color to drag and smear. While you wait, avoid touching anything—let your hands rest on the table or in your lap while colored polish sets.
Step 5: Apply Top Coat for Longevity and Shine
Top coat transforms good manicures into great ones by sealing colored polish, adding glossy shine, and dramatically extending wear time. Apply top coat after colored polish has dried to light touch—wet enough to bond with color layers but dry enough that brushing won’t drag color.
Use the same three-stroke application technique: center and two sides, covering the entire nail surface in thin, even layers. Top coat should be slightly thinner than your colored polish coats—thick top coat takes forever to dry and can become cloudy or shrink as it cures, pulling away from nail edges.
Capping tips with top coat is even more critical than with base and color coats. Generously seal the free edge with top coat, creating protective barriers that prevent chips from starting at tips—the area receiving most wear and impact. Some nail professionals recommend wrapping tips by brushing top coat across the free edge and then slightly underneath the nail tip for maximum protection.
For extra shine and longevity, some people apply two thin layers of top coat rather than one thick layer, allowing the first to dry before adding the second. While not necessary for basic manicures, this technique benefits special occasions when you want maximum durability and shine. If applying two top coat layers, wait 2-3 minutes between them for proper drying.
Fast-dry top coats significantly reduce waiting time before your manicure is safe to touch and use. These formulas contain ingredients that accelerate solvent evaporation, hardening polish in minutes rather than the 30-60 minutes regular top coats require. If you’re impatient or have busy schedules, invest in quality fast-dry top coat—it’s worth the extra cost for convenience.
After applying top coat, remain still for at least 5-10 minutes to allow surface drying. During this time, avoid touching anything, waving hands (which disturbs polish curing), or blowing on nails (which can cause bubbling and uneven drying). Instead, sit quietly, watch television, or use voice commands to use your phone.
Step 6: Drying and Final Clean-Up
Proper drying is where many home manicures fail—smudges from touching things too soon ruins otherwise perfect application. Polish dries in stages: the surface becomes touch-dry relatively quickly (5-10 minutes with fast-dry top coat), but underlying layers continue curing for hours. Plan manicures when you can avoid hand-intensive activities for at least an hour after finishing.
Accelerate drying with these techniques: apply quick-dry drops or spray products designed to speed polish hardening, submerge nails in ice water for 3-5 minutes after 10 minutes of air drying, or use fans to circulate air around nails (though avoid blowing directly on wet polish, which can cause bubbling). Some people use hair dryers on cool settings, though heat can cause bubbling and uneven drying.
While waiting for full drying, perform final clean-up to perfect your manicure. Once top coat has hardened sufficiently (15-20 minutes), use a small clean-up brush dipped in nail polish remover to clean polish that flooded onto skin or cuticles. Work carefully with a light touch, removing excess polish without disturbing your manicure. Alternatively, use a cotton swab with pointed ends for clean-up, though brushes offer more precision.
Some manicurists prefer using peel-off barriers that prevent the need for clean-up. These latex-based liquids paint around nails before polish application; after polish dries, the barrier peels away with any polish overflow, leaving perfect edges. While these products work well, they add steps and cost that simple remover clean-up doesn’t require.
After clean-up, apply cuticle oil generously to each nail, massaging it into cuticles and surrounding skin. This step rehydrates areas dried by polish remover and creates attractive, healthy-looking cuticles that frame your perfect summer nails beautifully. Even though you applied cuticle oil during preparation, this final application makes significant difference in the finished appearance.
Wait at least one full hour before engaging in activities requiring hand use—washing dishes, showering, applying lotion, typing extensively, or handling objects. If you must use your hands, work very carefully, using fingertips rather than pads of fingers to avoid pressure on nail surfaces. For critical manicures (special events, photos), allow 2-3 hours of careful drying time for absolute security.
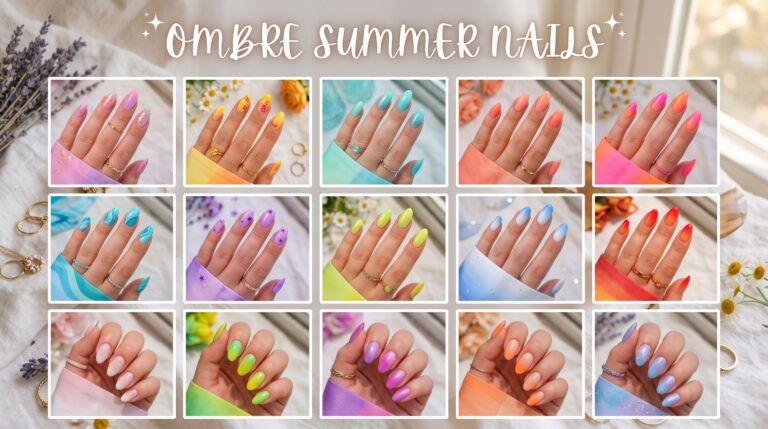
Popular Summer Nail Designs and Trends for 2024
Bright and Neon Colors
Summer 2024 embraces vibrant, high-energy colors that capture the season’s playful spirit. Neon shades have surged in popularity, including electric pink, lime green, bright orange, hot yellow, and vivid blue. These eye-catching colors make bold statements perfect for summer parties, festivals, and vacation photos. Neon polishes look particularly striking against tanned skin, creating dramatic contrast and modern aesthetics.
Apply neon polishes over white base color for true neon vibrancy. Many neon formulas appear somewhat muted when applied directly over natural nails or clear base coat, but white backgrounds allow pigments to appear their brightest. Paint your base coat, then apply two coats of white polish, allowing it to dry completely before adding neon colors. This technique transforms mediocre neon shades into properly vivid results.
Bright, saturated non-neon colors also dominate summer trends. Rich coral shades that blend pink and orange create universally flattering options suitable for various skin tones. Vibrant turquoise and aqua blues evoke ocean and swimming pool imagery perfect for beach vacations. Sunny yellow in various intensities from soft butter to bold lemon adds cheerful pops of color. Hot magenta and fuchsia offer sophisticated takes on pink that feel more adult than bubblegum shades.
For those who find full neon or bright manicures overwhelming, incorporate these colors through accent nails—painting one or two nails per hand in bright shades while keeping others neutral. This approach provides color impact without full commitment. Alternatively, try neon or bright tips on neutral bases (reverse French manicures) for modern, balanced looks.
Pastel and Soft Summer Shades
While brights dominate summer trends, soft pastels offer elegant alternatives for those preferring subtle sophistication. Summer 2024 pastel palettes include mint green, lavender, baby blue, soft peach, butter yellow, and millennial pink. These gentle shades create fresh, clean aesthetics perfect for professional settings, weddings, or people who prefer understated nail looks.
Pastel application requires attention to formula consistency and base preparation. Many pastel polishes tend toward sheer, streaky formulas that require three or more coats for opacity—test your specific formula to determine how many coats achieve solid coverage. Some pastel enthusiasts use white polish as base layers, then apply pastel shades over them, creating opacity with fewer coats and ensuring true pastel colors.
Combine multiple pastels for playful, whimsical manicures. Paint each nail a different pastel shade for rainbow effects without the intensity of bright rainbow nails. Create pastel ombre gradients by blending two or three related shades from finger to finger or within individual nails using sponge techniques. Pastel color-blocking with geometric designs offers modern, artistic interpretations of soft color trends.
Pastel neutrals—particularly soft beige, cream, and nude shades—create sophisticated, elongating effects suitable for any occasion. These shades work beautifully for people in conservative professional environments where bold colors aren’t appropriate. Summer 2024 embraces warmer nude tones rather than the cool, gray-based nudes of previous years, with peachy and golden undertones that complement summer tans.
Tropical and Beach-Inspired Nail Art
Tropical nail art celebrates summer through imagery inspired by beach vacations, island getaways, and warm-weather flora. Popular tropical motifs include palm trees and fronds, hibiscus and tropical flowers, flamingos and other exotic birds, pineapples and other tropical fruits, ocean waves and beach scenes, and sunset gradients in warm oranges and pinks.
Create simple tropical nail art using nail art brushes and multiple polish colors. For example, paint nails in sky blue or turquoise base colors, then add palm tree silhouettes using black polish and thin detail brushes. More complex designs layer multiple colors to create dimensional flowers, detailed fruit illustrations, or intricate beach scenes.
For beginners intimidated by freehand nail art, use nail stickers, decals, or stamping plates featuring tropical imagery. These tools enable complex designs without artistic skills or steady hands. Apply stickers over base colors and seal with top coat, or use stamping techniques to transfer detailed tropical patterns onto nails perfectly.
Tropical nail art works beautifully as accent designs rather than on all nails. Paint most nails in solid complementary colors—perhaps coral, white, or navy—then create detailed tropical scenes on ring fingers or thumbs. This approach showcases art without overwhelming the overall look and reduces the time required for detailed work on all ten nails.
French Tips and Modern Variations
Classic French manicures remain timelessly elegant, but modern interpretations update traditional white tips on pink bases with creative variations perfect for summer. Standard French manicures feature sheer pink or nude base colors with white free edges, creating clean, sophisticated looks suitable for any occasion. This classic never truly goes out of style, making it reliable choice for summer weddings, professional settings, or simply elegant everyday nails.
Summer 2024 embraces colorful French tip variations that maintain the classic silhouette while introducing personality and playfulness. Replace traditional white tips with bright summer colors—neon pink, coral, turquoise, or yellow—over nude or white bases. Use multiple colors for rainbow French tips, painting each nail’s tip a different bright shade. Glitter or metallic tips over solid bases create party-ready variations perfect for summer evening events.
Reverse French manicures flip the traditional design, creating colored half-moons at cuticles instead of colored tips. This modern variation elongates nails visually and offers fresh takes on familiar styles. Minimal French variations feature extremely thin tip lines rather than traditional wider tips, creating subtle, modern sophistication.
Create DIY French manicures using several techniques. Nail guides or French manicure strips stick onto nails, creating masks that guide paint application for straight, even tip lines—paint over the guide, peel it away after polish dries slightly, and seal with top coat. Alternatively, use thin nail art brushes to carefully freehand tip lines, a technique requiring practice but offering complete creative control. Some home manicurists find it easiest to paint entire nails in tip colors, then use clean-up brushes with remover to create curved tip shapes by removing excess polish.
Minimalist and Negative Space Designs
Minimalist nail art emphasizes simplicity, clean lines, and intentional use of negative space (unpainted nail areas) for modern, artistic effects. This trend suits people who appreciate contemporary design, prefer subtle nail looks, or want artistic manicures without overwhelming patterns or bright colors.
Negative space designs strategically leave portions of natural nails visible, often outlined or accented with polish. Popular negative space styles include geometric designs with angular shapes leaving triangular or rectangular nail sections clear, curved negative space creating moon or wave patterns, line art with thin polish lines on mostly bare nails, and minimalist French variations with gaps between tip colors and bases.
Create negative space designs using tape as masks. Apply thin striping tape, regular painter’s tape cut to size, or specialized nail art tape to clean, dry nails in desired patterns. Paint over tape with colored polish, allow it to dry slightly, carefully remove tape to reveal clean negative space, and seal with clear top coat. This technique produces crisp, professional-looking geometric designs without artistic skills.
Minimalist nail art also includes simple accent details on otherwise plain nails—single dots, minimal lines, small shapes on one or two accent nails, or subtle color-blocking. These understated designs add interest without requiring extensive time or complex techniques, making them perfect for busy people who want stylish nails without elaborate processes.
Chrome, Metallic, and Holographic Finishes
Reflective, dimensional finishes represent major summer 2024 trends, offering futuristic aesthetics perfect for festivals, parties, and fashion-forward looks. Chrome nails feature mirror-like finishes created using chrome powders rubbed onto gel polish or applied over regular polish with special base coats. True chrome nails require gel polish and powder application, but chrome-effect regular polishes approximate the look without special equipment.
Metallic polishes contain reflective particles that create shiny, metal-like finishes in gold, silver, bronze, copper, and colored metallics like rose gold or gunmetal. These polishes apply like regular colors—no special techniques required—making them accessible options for achieving trendy metallic looks. Metallic finishes work beautifully as accent nails with matte or cream polishes, or as full manicures for maximum impact.
Holographic polishes contain special pigments that create rainbow light effects when hit by light, appearing to shift colors and sparkle multi-dimensionally. Linear holographic polishes display strong rainbow lines, scattered holographic polishes create overall sparkle, and holographic top coats add dimensional effects over any base color. Holographic nails photograph beautifully, making them popular for social media and special events.
Apply chrome powders by painting base coat, colored base polish, and gel top coat (or regular top coat on regular polish), then rubbing chrome powder onto the tacky layer with silicone tools or eyeshadow applicators before the top coat fully dries. The powder bonds to tackiness, creating reflective finishes. Seal with additional top coat for protection. While chrome application requires practice and patience, results rival professional salon chrome manicures at fraction of the cost.
Maintaining Your Summer Nails for Long-Lasting Results
Daily Care and Protection
Extending manicure life requires daily care and conscious protection from activities that damage polish. The most important maintenance habit is wearing gloves during wet work—washing dishes, cleaning with chemicals, gardening, or any prolonged water exposure. Water softens polish and causes it to lift and chip, while cleaning chemicals break down polish formulas. Invest in quality rubber gloves and wear them religiously for household tasks.
Apply cuticle oil daily, ideally before bed, massaging it into cuticles and over entire nails. This simple step maintains cuticle health, prevents hangnails, supports nail growth, and adds subtle shine to manicures. Cuticle oil also prevents polish from becoming brittle and cracking, extending wear time significantly. Keep cuticle oil pen or bottle on your nightstand as a reminder to apply nightly.
Be mindful of how you use your hands to prevent chips and breaks. Use knuckles or tools rather than nails to open cans, peel stickers, or perform other tasks that stress nails. Avoid using nails as tools—scraping, prying, or picking at things dramatically increases chipping and breaking. When typing, use finger pads rather than nail tips to reduce impact stress.
Moisturize hands and nails frequently, especially during summer when sun exposure, swimming, and air conditioning create drying conditions. Hand cream prevents skin around nails from becoming dry and cracked while maintaining overall hand appearance that complements your manicure. Choose non-greasy formulas that absorb quickly if you dislike the feeling of oily hand cream.
Reapply top coat every 2-3 days to refresh shine and seal any minor chips before they spread. This simple maintenance step takes minutes but significantly extends manicure life. Keep your top coat easily accessible—perhaps at your desk or bedside—so reapplication becomes an effortless habit rather than a chore requiring nail supply gathering.
Dealing with Chips and Quick Fixes
Despite careful protection, chips happen. Address them promptly to prevent spreading and to maintain neat appearance. For minor chips on nail edges or tips, file the area gently to smooth the damaged edge, then apply a thin layer of matching colored polish over the chip. Allow it to dry, then seal with top coat. This spot treatment often makes chips virtually invisible.
For larger chips exposing significant natural nail, removal and repainting that nail (or all nails) may be necessary for cohesive appearance. Some people maintain “emergency kits” with their current polish color, base coat, top coat, and small files for quick repairs at work or while traveling.
If your manicure develops multiple chips or appears generally worn, consider refreshing it with new top coat rather than complete removal. Clean nails gently with soap and water, allow them to dry completely, then apply fresh top coat over the entire manicure. This refresh adds new shine and seals minor wear, potentially extending your manicure another few days.
For glitter polishes that lose sparkle but remain otherwise intact, apply fresh glitter polish layer over the existing manicure, then seal with top coat. Glitter polishes are forgiving—new layers blend seamlessly with existing polish without showing obvious repair work.
When chips are too extensive for repair or your manicure looks generally worn and damaged, remove it and start fresh rather than trying to extend it indefinitely. Wearing obviously chipped, damaged manicures looks less polished than bare, well-maintained natural nails. Most home manicures last 5-7 days with proper care; if yours consistently chip earlier, assess your application technique and protection habits.
Swimming, Sun, and Summer Activities
Summer activities pose unique challenges to manicure longevity. Chlorinated pool water softens polish and causes lifting, fading, and premature breakdown. While you don’t need to avoid swimming with polished nails, take precautions: ensure manicures are completely dry (24 hours after application is ideal) before swimming, reapply top coat after swimming and drying nails, and moisturize nails and cuticles after pool exposure with cuticle oil to counteract chlorine’s drying effects.
Saltwater creates similar issues to chlorine, though generally less damaging. Ocean swimming affects nail polish less than pool swimming due to lower chemical concentrations. However, sand acts as abrasive exfoliant that can dull polish shine—reapply top coat after beach days to restore gloss.
Sun exposure causes some colored polishes to fade or change color, particularly with extended daily exposure throughout summer. Darker colors and reds tend to fade most noticeably. Choose fade-resistant formulas when possible, or embrace fading as part of summer nail aesthetics. Some top coats include UV inhibitors that reduce color fading—worth considering if you spend significant time outdoors.
Sports and active summer activities increase chip and break risk through impact and hand use. If you participate in activities like tennis, volleyball, or rock climbing, keep nails shorter and choose durable, chip-resistant formulas. Reapply top coat more frequently (daily) if your lifestyle is particularly hard on manicures.
Outdoor concerts, festivals, and events where your hands will be photographed frequently make perfect occasions for special nail art and bold colors. Plan elaborate manicures for these events, accepting they may not last as long due to festival conditions (camping, limited washing facilities, crowded environments). Create special occasion nails for specific events rather than expecting them to last through multiple weeks of regular wear.
When to Remove and Start Fresh
Know when manicures have reached the end of their lifespan and require removal rather than continued touch-ups. Signs your manicure needs removing include significant chipping on multiple nails, polish lifting at cuticles or edges, dull appearance despite top coat reapplication, visible nail growth creating gaps at cuticle lines, and polish that has faded significantly or changed color.
Remove polish using proper technique to protect nail health. Avoid peeling or picking polish off, which removes layers of natural nail with the polish, causing damage, weakness, and peeling. Instead, use polish remover and cotton pads with the soak-and-wipe method described earlier in this guide.
For glitter polishes that resist normal removal, use the foil method: saturate cotton pads with acetone remover, press onto nails, wrap fingertips with aluminum foil, wait 10 minutes, then wipe away softened polish. This technique works for stubborn regular polishes as well.
After removal, give nails brief breaks between continuous polishing if possible. Even 24-48 hours allows nails to breathe and recover, though constant polishing isn’t as damaging as once believed if you use quality products and proper application techniques. During breaks, apply strengthening treatments, intensive cuticle oil, and hand masks to pamper nails.
If you notice nail damage—brittleness, peeling layers, yellowing, or unusual texture—take extended breaks from polish while you address underlying health issues. Use strengthening treatments, moisturize aggressively with cuticle oil, and consider whether your remover (particularly acetone) is too harsh for your nails. Sometimes switching to gentler, non-acetone removers resolves damage issues.
Common Mistakes and How to Avoid Them
Skipping Base Coat
Skipping base coat is one of the most common and damaging mistakes in at-home manicures. Many people skip this step to save time or because they don’t understand its importance. However, base coat provides critical benefits that directly impact both manicure quality and nail health.
Without base coat, colored polish stains natural nails, particularly with dark or highly pigmented colors like reds, dark purples, and blacks. These stains penetrate porous nail surfaces, creating yellow or discolored nails that persist long after polish removal. Dark nail staining is difficult to remove and aesthetically unpleasant when you want bare nails.
Base coat also creates adhesive surfaces that help colored polish bond to nails rather than peeling or chipping quickly. Polishes applied directly to natural nails lift at edges and chip at tips much faster than properly base-coated nails. The minutes saved by skipping base coat result in days of lost manicure life.
Additionally, base coats with ridge-filling or strengthening ingredients improve the appearance of natural nails with imperfections while supporting nail health. These benefits disappear when you skip the base coat step.
Make base coat non-negotiable in your routine by incorporating it into your process mentally as part of polish application rather than an optional extra. Store base coat with your colored polishes as a visual reminder. If time is truly constrained, choose one thin coat of quick-dry base over no base at all.
Applying Polish Too Thickly
Thick polish layers create multiple problems: extended drying time, increased likelihood of smudging, bubbling, uneven texture, and faster chipping. Many beginners apply thick coats hoping to achieve opacity faster, but this approach backfires by creating poor-quality manicures prone to early failure.
Thick polish traps solvents inside, preventing proper drying. The surface may appear dry while underlying layers remain wet, leading to smudges and dents from pressure applied to seemingly dry nails. Thick polish also tends toward goopy, uneven application with visible brush strokes and texture irregularities.
Instead, embrace thin coats as the foundation of quality manicures. Wipe excess polish from brushes before application. Apply light pressure while brushing polish onto nails. Accept that first coats will be somewhat sheer and streaky—this is correct and expected. Build opacity through additional thin coats rather than attempting full coverage in one pass.
If your chosen polish requires three or more thin coats for opacity, the formula itself is too sheer rather than your application being inadequate. Consider different polishes with better pigmentation, or accept that some colors (particularly pastels and neons) inherently require more coats.
Thin coats dry quickly between applications, allowing you to complete full manicures faster than you could if waiting for thick coats to dry. They also create smooth, professional-looking finishes and chip less readily than thick, heavy polish applications.
Not Allowing Proper Drying Time Between Coats
Impatience is the enemy of perfect manicures. Applying subsequent coats over wet previous coats causes dragging, smudging, uneven texture, and poor adhesion between layers. Polish needs adequate drying time to cure properly and create stable, long-lasting manicures.
Between base coat and first color coat, wait 1-2 minutes for base coat to dry to touch. Between first and second color coats, wait 2-3 minutes for the first coat to feel dry when touched lightly. Before applying top coat, wait 2-3 minutes after your final color coat for it to set adequately.
Use inter-coat drying time productively rather than sitting idle feeling impatient. Scroll through your phone using voice commands or knuckles rather than fingertips, sip water or tea, watch television, or simply rest. These brief pauses dramatically improve final results.
Test dryness by lightly touching polish with a clean finger from your opposite hand. If it feels dry and doesn’t transfer color, it’s ready for the next coat. If it feels tacky or transfers color, wait another minute and test again.
Quick-dry products help accelerate drying between coats. Quick-dry top coats dry faster than regular formulas, while quick-dry drops or sprays accelerate curing of all polish layers. These products don’t eliminate drying time entirely but reduce it significantly, helping impatient manicurists achieve better results.
After completing your entire manicure, wait at least 30-60 minutes before using your hands normally. Surface-dry polish can still smudge or dent from pressure if underlying layers haven’t fully cured. Plan manicures during relaxation time when you won’t need hands immediately—before bed, during movie watching, or while reading.
Flooding Cuticles and Skin
Polish that floods onto cuticles and skin creates messy-looking manicures and can cause chipping as polish lifts from skin and pulls away from nails. Many beginners struggle with flooding, either from applying polish too close to cuticles or from using too much polish that spreads uncontrollably.
Prevent flooding by wiping excess polish from brushes before application and leaving small gaps (1-2 millimeters) between polish and cuticles. This narrow margin of bare nail is virtually invisible once polish dries but prevents accidental skin contact. As polish settles and self-levels slightly during drying, it often spreads into these small gaps anyway.
If you do flood cuticles during application, don’t try to fix it while polish is wet—you’ll likely spread it further and make the problem worse. Instead, allow polish to dry completely, then use clean-up brushes dipped in nail polish remover to carefully clean edges and create precise cuticle lines. Small, pointed brushes offer better control than cotton swabs for detailed clean-up work.
Alternatively, apply peel-off barrier products around nails before polishing. These latex-based liquids brush onto skin surrounding nails, dry to form protective barriers, and collect polish overflow. After your manicure dries, peel the barrier away with attached excess polish, leaving clean edges. While this technique adds steps, it virtually eliminates flooding concerns and creates professional-looking results even for beginners.
Proper cuticle preparation also reduces flooding. Well-pushed-back cuticles create larger nail beds with more space for polish application away from skin. If you consistently struggle with flooding despite careful application, reassess whether your cuticles need better pushing back to expose more nail surface.
Forgetting to Cap the Tips
“Capping the tips” means running your polish brush across the free edge (the nail extending beyond your fingertip) during each coat application—base coat, colored coats, and top coat. This technique seals nail edges completely, preventing moisture and impact from causing polish to lift and chip from tips.
Tips receive the most wear and contact with surfaces during daily activities—typing, picking up objects, opening containers. Uncapped tips allow water, oils, and impact to penetrate between polish and nail, causing lifting that quickly spreads into full chips. Properly capped tips resist this wear, significantly extending manicure life.
After applying polish to the nail surface, simply run the brush tip across the free edge before moving to the next nail. This takes mere seconds per nail but dramatically impacts durability. Make capping tips an automatic part of your technique rather than an afterthought.
For people with very short nails with minimal free edge, capping is still beneficial even though less nail edge exists. Even tiny free edges benefit from sealing. If you truly have no free edge due to extremely short nails, focus on sealing the nail edge as completely as possible during normal application.
Some nail professionals recommend also brushing a thin line of top coat along the underside of nail tips for maximum protection, though this isn’t necessary for most home manicures. Standard capping of the free edge’s top surface provides adequate sealing for everyday wear.
Using Old or Low-Quality Products
Product quality directly impacts results. Old, thickened polish applies unevenly, dries slowly, chips quickly, and often separates into inconsistent texture. Expired or aged products lose effectiveness—old top coats don’t provide adequate shine or protection, while old base coats don’t adhere properly.
Replace polishes that have separated significantly (oil and pigment layers that won’t remix despite shaking), developed thick, goopy consistency despite adding thinner, changed color or smell, or become stringy and unworkable. While nail polish doesn’t expire in the traditional sense, it degrades over time, particularly if stored poorly.
Store polish properly to extend its life: keep bottles tightly closed when not in use, store in cool, dark places away from temperature fluctuations, avoid bathroom storage where humidity and temperature vary significantly, and organize bottles upright rather than on sides to prevent cap leakage.
Invest in quality products rather than always choosing the cheapest options. Budget polishes often require more coats for opacity, chip faster, and contain lower-quality ingredients that don’t perform as well as mid-range or professional formulas. You don’t need the most expensive luxury polishes, but avoid rock-bottom budget formulas that frustrate more than they satisfy.
Research product reviews before purchasing new brands or formulas. Online communities, beauty blogs, and retail websites provide user reviews that reveal how products perform in real-world use. Products with consistently positive reviews generally deliver better results than those with mixed or negative feedback.
Quality tools matter as much as quality polishes. Invest in proper nail files, good brushes for clean-up and nail art, and quality cuticle care tools. These items last years with proper care and dramatically improve your ability to create professional-looking manicures at home.
Advanced Tips for Salon-Quality Results at Home
Temperature and Environment Control
Environmental conditions significantly impact manicure success. Ideal polish application occurs at moderate room temperature (68-72°F) with low to moderate humidity. Extremely cold environments cause polish to thicken and apply unevenly, while very hot conditions cause polish to thin and dry too quickly, creating bubbling and texture issues.
Avoid doing manicures in humid environments like bathrooms immediately after hot showers—moisture in the air interferes with proper polish drying and can cause clouding or dulling. Instead, choose well-ventilated rooms with consistent temperature and moderate humidity.
Temperature also affects polish consistency in bottles. Cold polish thickens and becomes difficult to apply smoothly. If your polish storage area is cold, allow bottles to come to room temperature before using them. Roll bottles between your palms to warm slightly and improve flow, or run closed bottles under warm (not hot) water briefly.
Lighting matters for precision work. Perform manicures in bright, even lighting that allows you to see clearly what you’re doing. Natural daylight is ideal for seeing true colors and catching application mistakes, though quality artificial lighting works well too. Avoid dim lighting that makes precision work difficult and hides errors until you’re in better light.
Work surface height affects comfort and control. Sit at a table or desk at appropriate height rather than working with hands in your lap or on unstable surfaces. Use a towel or dedicated mat to protect surfaces from polish spills. Having stable work areas at proper heights enables better control and precision during application.
Creating Custom Colors
Mix your own custom polish colors for unique shades unavailable in stores. Start with white, black, and several base colors, then blend to create desired shades. Mix polishes on small palettes or in empty polish bottles, combining small amounts until you achieve perfect colors.
Lighten any color by adding white polish, darken with black polish, or adjust undertones by adding complementary shades. For example, add a drop of yellow to purple polish for warmer, more blue-toned results, or add red to orange for deeper coral shades. Keep notes about your ratios so you can recreate successful custom colors.
Create custom glitter or shimmer polishes by adding loose cosmetic glitter or pigments to clear top coat or neutral polish bases. This technique allows you to create signature sparkle shades that don’t exist in commercial polish lines. Use cosmetic-grade glitter specifically designed for nail or makeup use rather than craft glitter, which uses different sizes and shapes that don’t suspend well in polish.
Mix polish finishes to create unique effects. Combine matte and glossy polishes for satin finishes, blend metallic and cream polishes for subtle shimmer, or mix different glitter sizes for complex sparkle effects. Experimentation often produces happy accidents that become favorite custom shades.
Store custom mixes in empty polish bottles (available from beauty supply stores) with proper labels noting ingredients and ratios. This organization allows you to recreate successful blends and build libraries of signature shades unavailable anywhere else.
Using Tools for Precise Application
Specialized tools elevate home manicures from basic to professional-quality. Precision brushes in various sizes enable detailed nail art, clean-up work, and careful polish application to small nails or tight spaces. Invest in a set including thin detail brushes, flat shader brushes, and angled brushes for various techniques.
Dotting tools create perfect circles, dots, flowers, and polka dot designs impossible to achieve with brushes. These tools feature ball tips in various sizes that pick up polish and transfer it to nails in perfect round shapes. Use dotting tools for easy nail art that looks complex but requires minimal skill.
Striping brushes with long, thin bristles create precise lines for geometric designs, stripes, and other linear nail art. Load these brushes with polish and draw smooth, even lines across nails with steady hand movements. Striping tape offers alternative methods for creating perfect lines—apply tape to nails, paint over it, and remove it before polish dries to reveal crisp lines.
Nail stamping kits enable complex, detailed designs without artistic ability. These kits include etched plates with designs, stampers that transfer patterns, and instructions for technique. Apply special stamping polish to etched designs, scrape excess away, press the stamper onto the design to pick it up, then roll the stamper onto polished nails to transfer the pattern. With practice, stamping creates intricate nail art in minutes.
Silicone tools including brushes, mats, and wedges help with gradient nails, marble effects, and chrome application. These non-stick tools don’t absorb polish like traditional materials, making them ideal for certain techniques. Sponges create gradient ombre effects—dab different colors onto makeup sponges, then press onto nails, blending colors where they meet.
Learning from Tutorials and Practice
Improve your skills through online tutorials that teach specific techniques. YouTube, Instagram, and TikTok host thousands of nail art tutorials demonstrating everything from basic application to advanced designs. Search for specific techniques you want to learn and watch multiple tutorials to see different approaches.
Practice new techniques on practice nails or nail wheels before attempting them on your own nails. Nail wheels—wheel-shaped tools with multiple practice nail tips—allow unlimited practice without consequences. Perfect techniques on practice nails, then apply learned skills to actual manicures with greater confidence and ability.
Document your manicures with photos to track progress and identify areas needing improvement. Review photos objectively to spot application issues—flooding, uneven polish, streaky coverage—then research how to address specific problems. This self-assessment accelerates skill development more effectively than casual practice without review.
Join online nail art communities where enthusiasts share techniques, product recommendations, and troubleshooting advice. These communities provide supportive environments for asking questions, sharing your work, and learning from others’ experiences. Reddit, Facebook groups, and specialized forums host active nail art communities welcoming beginners.
Accept that skills develop through practice—your tenth manicure will be better than your first, and your fiftieth will surpass your tenth. Don’t get discouraged by early attempts that don’t meet your standards. Instead, view each manicure as practice opportunity, focusing on incremental improvement rather than instant perfection. Professional-looking home manicures require patience and practice, but they’re absolutely achievable with dedication.
Troubleshooting Common Summer Nail Problems
Polish Won’t Dry
Polish that remains wet or tacky despite extended drying time indicates several possible issues. Most commonly, thick polish coats prevent proper drying—polish surfaces dry while underlying layers remain wet. The solution is complete removal and reapplication using thinner coats with adequate drying time between layers.
Old, expired, or separated polish may not dry properly due to formula degradation. Test your polish on a practice nail or nail wheel before applying to all nails—if it doesn’t dry within reasonable time, the product itself is the problem. Dispose of polishes that consistently won’t dry and replace with fresh bottles.
Environmental humidity prevents proper drying for some polishes. Avoid doing manicures immediately after showers in bathrooms, in extremely humid conditions, or in rooms with poor ventilation. Choose dryer environments with good airflow for best drying results.
Quick-dry products help polish that’s drying slowly. Apply quick-dry top coat after colored polish to accelerate the entire manicure’s curing. Alternatively, use quick-dry drops or spray products designed to speed drying—these work through various mechanisms including oil-based formulas that drive out polish solvents faster.
For already-applied polish that won’t dry, very carefully apply quick-dry top coat or drops without disturbing the wet polish underneath. Allow extended drying time—several hours if necessary—before touching or using hands. If polish remains wet after this intervention, removal and reapplication will likely be necessary.
Bubbles in Polish
Bubbles in dried polish create textured, bumpy surfaces that look unprofessional. Bubbles form from several causes. Most commonly, shaking polish bottles rather than rolling them incorporates air into formulas. Always roll polish bottles between palms to mix rather than shaking vigorously.
Applying polish in very hot environments or in direct sunlight causes quick solvent evaporation that traps air bubbles. Perform manicures in climate-controlled environments away from heat sources and direct sun. If your polish storage area is hot, allow bottles to cool to room temperature before using.
Blowing on wet polish to accelerate drying introduces air that creates bubbles. Instead, allow polish to air dry naturally or use fans from distance rather than blowing directly on nails. Quick-dry products offer better alternatives to blowing for impatient manicurists.
Old, thickened polish is more prone to bubbling than fresh, properly-consistent formulas. If your polish has thickened significantly, add a few drops of nail polish thinner to restore proper consistency and reduce bubbling tendency.
Prevent bubbles by using proper techniques: roll rather than shake, apply thin coats, allow adequate drying between coats, avoid extreme temperatures, and don’t blow on wet polish. If bubbles do appear in dried polish, light buffing with fine-grit buffer can smooth them, followed by fresh top coat to restore shine.
Polish Chipping Quickly
Manicures that chip within 1-2 days indicate technique or product issues requiring correction. Most commonly, skipped base coat, skipped top coat, or not capping tips causes fast chipping. Ensure you always apply base coat before color, cap free edges with every coat including base and top, and finish with quality top coat.
Failure to properly prepare nails—leaving oils on nail surfaces, not pushing cuticles back, applying polish over dirty nails—prevents proper adhesion and causes rapid chipping. Review the preparation steps outlined earlier and ensure you complete each thoroughly.
Exposure to water, chemicals, and hard use without protection causes even well-applied manicures to chip faster. Wear gloves for wet work, avoid using nails as tools, and be mindful of impact and pressure on nails. Reapply top coat every 2-3 days to refresh protective layers.
Low-quality or expired base coat and top coat don’t provide adequate adhesion and protection. Invest in quality base and top coats from reputable brands, even if you use budget-friendly colored polishes. These foundation and sealing products make the biggest difference in manicure longevity.
Extremely thin or damaged nails chip more easily than healthy nails regardless of technique. Address underlying nail health through strengthening treatments, adequate hydration, and possibly biotin supplementation (consult healthcare providers before starting supplements). Healthy nails hold polish better and longer than damaged, weak nails.
Streaky or Uneven Color
Streaky polish application results from formula issues or technique problems. Low-quality polishes with poor pigmentation tend toward streaky application even with good technique. Test polishes on practice nails before committing to full manicures—if formulas remain streaky after two or three thin coats, the product itself is the issue.
Thick polish coats applied with heavy brush pressure create drag marks and visible brush strokes. Instead, use thin coats with light touch, allowing first coats to be somewhat sheer and streaky. Second coats typically cover streakiness from first coats when you use proper thin-coat technique.
Old, separated, or thickened polish applies unevenly. Restore proper consistency with nail polish thinner or replace aged polishes that no longer perform well. Always mix polishes thoroughly before use by rolling bottles to ensure pigments distribute evenly throughout formulas.
Uneven nail surfaces with ridges and texture cause polish to appear streaky as it settles into imperfections differently than smooth areas. Address this through proper buffing during nail preparation or by using ridge-filling base coats that create smooth surfaces.
For certain naturally sheer or jelly-finish polishes, some streakiness is inherent to the formula and intentional for the finish style. Understand the difference between streaky application errors and intentional sheer finishes. Sheer polishes often look best in 2-3 thin coats that build translucent color rather than opaque coverage.
Also Read: French Tip Nails With A Summer Twist You Will Love
Yellowing or Discoloration
Yellow-stained nails result from polish pigments penetrating porous nail surfaces, particularly from dark reds, purples, and blacks. This common problem emphasizes the importance of always using base coat, which prevents pigment absorption. If your nails are already stained, try whitening treatments specifically designed for nails, or use lemon juice and baking soda gentle scrubs.
Nicotine exposure causes yellow staining, as do certain medications, health conditions, and excessive self-tanner on hands. Address underlying causes while using stain-covering base coats that hide discoloration and prevent future staining.
Some whitening toothpastes gently scrub nails to reduce staining. Apply small amounts to dry nails and scrub with old toothbrushes, then rinse thoroughly. This household remedy sometimes reduces light staining, though it won’t eliminate deep discoloration.
Prevention is easier than correction for nail staining. Always apply base coat before colored polish, especially before dark or highly pigmented shades. Consider two thin base coat layers before very dark colors for extra protection. Allow nails occasional polish-free periods to breathe and recover from continuous polish wear.
For persistent staining that won’t respond to treatment, simply keep nails polished until staining grows out. Your new nail growth will be unstained, and within several weeks to months depending on growth rate, staining will have grown out and been clipped away.
Frequently Asked Questions
How long does a home manicure typically last?
Properly applied home manicures typically last 5-7 days before significant chipping or wear requires removal and fresh application. Several factors affect longevity: application technique quality, base and top coat usage, lifestyle and hand use intensity, polish quality, and maintenance efforts like reapplying top coat every few days. People who use their hands extensively for manual work, frequently expose nails to water, or skip base and top coats often experience shorter wear time of 2-4 days. Conversely, careful application with quality products, diligent glove-wearing for wet work, and daily cuticle oil application can extend manicures to 10 days or even two weeks. Gel polish applied at home with UV or LED lamps lasts significantly longer—typically 2-3 weeks—though it requires different application and removal processes than regular polish.
Can I swim with freshly painted nails?
Freshly painted nails should avoid water exposure for at least 12-24 hours after application to ensure complete drying and curing. While nail polish surfaces dry relatively quickly, underlying layers continue curing for hours after application. Swimming too soon after manicures causes incomplete polish to soften, bubble, or peel. If you must swim shortly after polishing nails, wait at least one hour and ensure you’ve used fast-dry products throughout your manicure. After swimming, thoroughly dry nails and reapply top coat once they’re completely dry to reseal any compromised areas. For special occasions where swimming and perfect nails are both priorities, complete manicures the day before rather than hours before water activities. This provides adequate curing time while still offering fresh-looking nails for events.
What’s the best way to make neon polish more vibrant?
Achieve true neon vibrancy by applying white polish as a base layer before neon colors. Start with clear base coat, then apply one or two coats of white polish, allowing it to dry completely. Once white base is dry, apply neon polish in thin coats—usually two coats achieve full opacity and maximum color intensity. The white background prevents natural nail color from showing through and dulling neon pigments, allowing them to appear their brightest. This technique works for all neon shades—pink, yellow, green, orange, and blue—transforming mediocre neon results into properly vivid, glowing color. For alternative approaches, specialized neon base coats formulated to enhance neon polish brightness are available from some brands, though white polish remains the most accessible and effective option for most people.
How do I prevent polish from staining my nails?
Prevent nail staining by always applying base coat before colored polish, especially before dark shades like deep reds, purples, blacks, and blues that stain most readily. Base coat creates protective barriers between natural nails and pigmented polishes, preventing color penetration into porous nail surfaces. For very dark colors or polishes you know stain easily, apply two thin layers of base coat rather than one for extra protection. Allow base coat to dry completely before applying colored polish. Quality base coats specifically formulated to prevent staining offer better protection than basic formulas. Additionally, give nails occasional breaks between continuous polish applications, allowing them to breathe and naturally exfoliate any minor surface staining before it sets deeply. If you notice slight staining developing, address it immediately with whitening treatments rather than waiting until it becomes severe.
Can I do nail art if I’m not artistic?
Absolutely—numerous nail art techniques require minimal artistic ability while producing impressive results. Start with simple designs using tools: dotting tools create perfect polka dots, stripes, and flowers without hand-drawing skills; striping tape produces clean lines and geometric patterns; nail stickers and decals offer complex designs that simply press onto nails and seal with top coat. Stamping kits enable extremely detailed, intricate designs through simple transfer processes rather than freehand painting. Gradient ombre effects using makeup sponges create beautiful color transitions without precision painting. Negative space designs strategically incorporate bare nail areas using tape as masks for clean edges. Practice simple techniques on practice nails before attempting them on yourself. Watch tutorial videos demonstrating beginner-friendly designs. Start with accent nail art—detailed designs on one or two nails with solid colors on others—rather than attempting complex art on all ten nails. Skills improve dramatically with practice, and many “impressive” nail art techniques are actually quite simple once you learn the proper tools and methods.
How can I make my manicure dry faster?
Accelerate drying through several strategies. First, apply thin polish coats rather than thick ones—thin layers dry exponentially faster while creating better-quality manicures overall. Use fast-dry base coat and top coat formulas designed to reduce drying time. Apply quick-dry drops or sprays after completing manicures—these oil-based products drive out polish solvents, accelerating curing. Submerge nails in ice water 10 minutes after finishing manicures (ensure top coat has started drying first)—cold temperature sets polish quickly. Use fans to circulate air around drying nails without blowing directly on wet polish, which can cause bubbling. Allow adequate drying time between coats—rushing this step ultimately slows overall process by creating application problems. Plan manicures during downtime when you can relax without hand use for 30-60 minutes. While none of these strategies produces instant results, combining them significantly reduces total drying time compared to simply air-drying regular polish with thick coats.
What should I do if I smudge my manicure?
How you address smudges depends on when they occur. For smudges in wet polish immediately after application, carefully smooth the area with a clean finger or brush dipped in polish, then reapply thin polish layer over the affected nail and seal with top coat. For smudges in polish that has started drying but isn’t completely set, lightly dab the area with nail polish remover on a cotton swab to slightly re-wet it, smooth with clean finger, allow it to dry, then apply fresh top coat. For smudges in nearly-dry polish, removal and complete repainting of the affected nail often produces better results than trying to fix damaged areas. To prevent smudges, allow adequate drying time before touching anything, avoid waving hands or blowing on nails, and remain still for at least 10 minutes after completing top coat. Keep quick-dry products accessible for manicures when time is limited. Accept that occasional smudges happen despite best efforts—develop efficient single-nail repainting skills for quick fixes when they occur.
Do I need different products for toenails versus fingernails?
You can use identical products for toenails and fingernails—polishes, base coats, top coats, and removers work the same on both. However, some people prefer specific approaches for pedicures. Toenails grow more slowly than fingernails, so pedicure polish lasts longer—often 2-3 weeks or more—making quality, long-wearing formulas particularly worthwhile. Toenails tend to be thicker and more prone to discoloration or fungal issues, so some people use specialized toenail treatments addressing these concerns. Foot-specific cuticle removers and treatments exist, though regular cuticle products work fine for most people. The main difference is technique rather than products: toenails require different positioning and angles during application, often more filing to manage thickness, and sometimes more aggressive cuticle work since toe cuticles are often drier and thicker than finger cuticles. Many people find pedicures easier than manicures since using your dominant hand to polish non-dominant hand nails is eliminated—both hands work on feet with equal ease.
Conclusion
Achieving perfect summer nails at home combines proper preparation, quality products, correct application technique, and consistent maintenance. By following the comprehensive steps outlined in this guide—from gathering essential tools to preparing nails properly, applying polish with precision, exploring seasonal designs, and maintaining results—you can create salon-quality manicures that celebrate summer’s vibrant energy while saving money and enjoying creative satisfaction.
Remember that perfect summer nails begin with healthy, well-prepared natural nails. Never skip preparation steps including cleaning, shaping, cuticle care, and buffing, as these create foundations for beautiful, long-lasting results. Always use base coat to protect nails and enhance adhesion, apply colored polish in thin layers with adequate drying time between coats, cap tips at every stage, and finish with quality top coat for shine and protection.
Embrace summer-specific trends including bright neons, soft pastels, tropical designs, modern French variations, minimalist negative space art, and metallic or chrome finishes. Experiment with different colors and techniques to discover which styles make you feel confident and beautiful. Don’t be intimidated by nail art—numerous beginner-friendly techniques using simple tools create impressive designs without artistic ability.
Extend your manicure’s life through daily care: apply cuticle oil nightly, wear gloves for wet work and cleaning, reapply top coat every 2-3 days, and protect nails from excessive impact and hard use. Address chips promptly with spot treatments or fresh manicures before damage spreads.
Avoid common mistakes including skipping base coat, applying thick polish layers, not allowing proper drying time, flooding cuticles, forgetting to cap tips, and using old or low-quality products. Understanding these pitfalls and actively avoiding them dramatically improves results.
Most importantly, practice and patience develop skills over time. Your technique will improve with each manicure as you refine your process, learn what works for your specific nails, and discover preferred products and styles. Perfect summer nails at home are absolutely achievable—with the knowledge and techniques from this guide, you’re equipped to create beautiful, professional-looking manicures throughout summer and beyond. Enjoy the creative process, experiment with seasonal trends, and take pride in the money saved and skills developed through doing your own nails at home.